

What Size Kiln For 2000 Board Foot Of Lumber
Many manufactures have been dedicated to solar lumber kilns: everything from a simple sail of Visqueen over a stack of lumber in the sunshine to elaborate enclosures designed for solar gain. The problems with solar kilns include limited command over temperature and limited solar exposure, depending on your region and site location. Additionally, I accept been underwhelmed past the performance of solar-operated fans.
My aim was to develop a small dehumidification kiln for better control of the 3 key components of lumber drying: temperature, airflow and humidity. A dehumidification kiln makes sense especially when the lumber is air-stale first. This limits the amount of energy needed to bring lumber to the desired 6% to 8% moisture content. Commercial scale steam kilns consume big amounts of energy. In contrast, a dehumidification kiln uses a sealed sleeping accommodation, with but enough energy input to maintain the desired temperature. With a well-designed dehumidification kiln, hardwood lumber can exist dried for mere pennies per board foot.
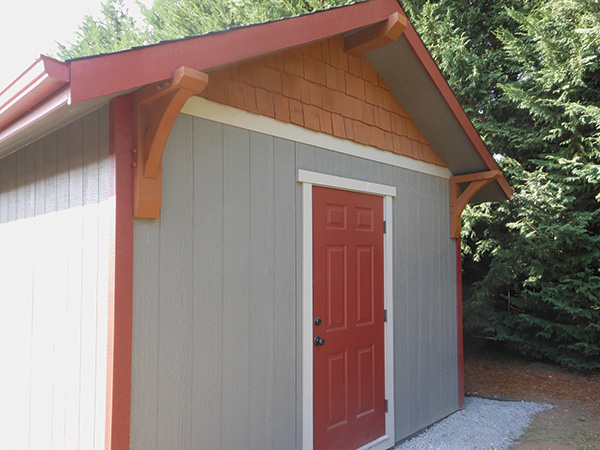
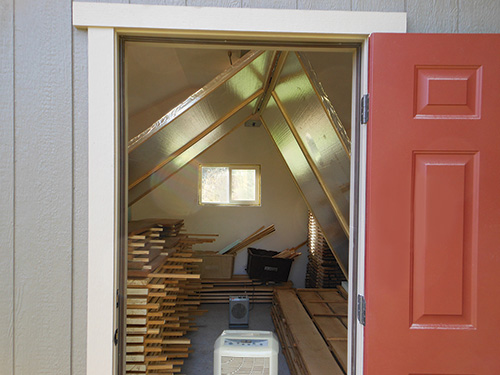
A shed kiln is an bonny alternative for a couple of reasons. It can be synthetic in any style, with architectural features that friction match or complement an existing home. Built properly, a shed kiln may even increment the value of a property. I don't think the same could be said for an onetime reefer truck converted into a kiln (no thing how well it dries lumber). Another reason I like the thought of a shed kiln is the flexibility of future use. Minus the drying equipment, a shed kiln is just an insulated storage space, with a host of possible uses.
Designing a Kiln
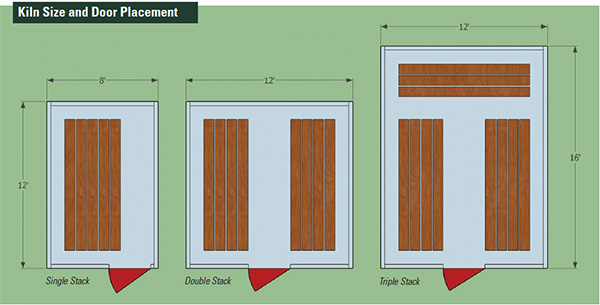
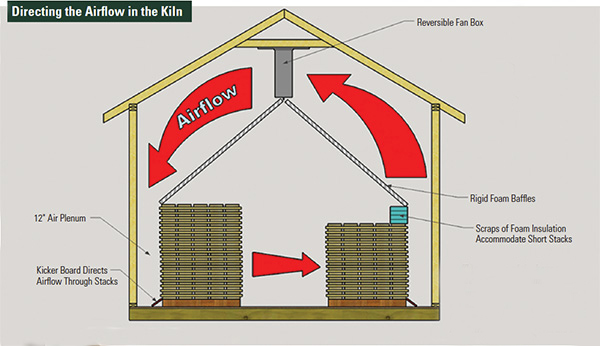
The first affair to consider when designing a shed kiln is size. Ideally, a lumber kiln would be large enough to dry multiple stacks of lumber. This lets the operator sort stacks by lumber species, and so they will be like shooting fish in a barrel to recall when the drying cycle is complete. Consider non only the space for the lumber stacks, but actress floor space to easily load and monitor the charge of lumber. Additionally, a 12″ air plenum is required between the walls and stacks of lumber. This air space is absolutely critical for fifty-fifty airflow, then count on the extra floor space correct from the design phase.
Many available kiln designs require a big, heavy door. My number one priority was to build a kiln that was easy to load and easy to monitor. For a single-stack kiln I recommend a minimum shed size of 8′ x 12′. This would let a stack of lumber four feet wide and ten feet long. The remaining width allows for a 36″-wide door and space for your drying equipment.
For more chapters, consider a two stack kiln (12′ x 12′), or a three-stack kiln (12′ x xvi′). Regardless of size, allow for a 36″ door that opens to a "hallway" of open up space. Changing the position of the doorway in various kiln setups helps provide the best access to the stacks of lumber.
Different full general store space, bigger is not always ameliorate for kiln design. If the interior book of a kiln becomes too large, bones heaters and home dehumidifiers may be inadequate to control the kiln environment. For a pocket-sized calibration shed kiln, I recommend a maximum footprint of 200 square feet. Many regions have increased the shed and outbuilding maximum commanded size without need for a allow. Bank check your local building codes for regionally specific requirements and electrical permits.
My shed kiln was stick-built from standard edifice material, and sized to have advantage of typical 4′ 10 8′ sheet appurtenances. The cost associated with shed structure was like to buying a prefabricated kit. In exchange for building the shed myself, I wound upwards with a shed of higher quality, with more features. A typical home center shed'south floors are underbuilt for the weight of a load of lumber.
Some other keen choice is to catechumen an existing shed or outbuilding to a lumber kiln. Any small edifice could work, as long as it has a minimum of ii″ x four″ framing, and volition seal out unwanted air. With advances in spray foam insulation, information technology may be possible to seal older, drafty structures also. Consider the weight of the lumber that will exist placed in the construction and fortify the edifice accordingly.
Constructing the Chamber
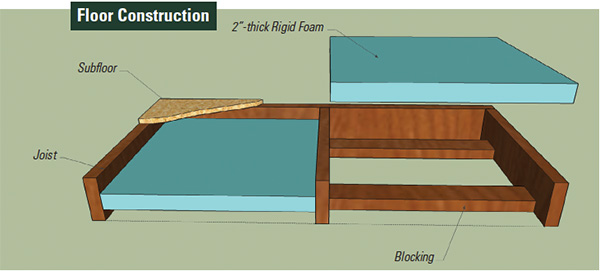
Structure of a kiln sleeping accommodation is very like to building a small house. Insulate the floor with 2″ rigid cream for convenience and durability. Extruded polystyrene cream (blue or pink rigid foam) in this thickness has an R value of 10. To adapt the floor insulation, blocking between joists is oriented horizontally instead of the normal vertical position. This serves a dual purpose of supporting the rigid foam insulation besides as stiffening the floor framing. Leave an air infinite between the rigid foam and subfloor for additional insulating properties. Insulation for walls and ceilings should exist a minimum of R13.
One time the floor deck is constructed, think about sealing the shed framing at every opportunity. A bead of silicone caulking between the subfloor and sill plate will preclude air infiltration. Lay down the bead of caulking before raising the walls. Corners where walls run into should be sealed with expanding cream sealant. Windows and doors are also sealed, also as any holes cut for electrical service.
Installing a window in a kiln may seem counterintuitive at starting time, because windows lose more heat than an insulated wall. However, the natural light and ventilation offered by a small-scale window outweighs any disadvantages. I recommend a 2′ x 3′ sliding window with bug screen. It should be double-pane, well-insulated with low emissivity (depression-East).
Size and placement of the admission door are critical as well. I selected a 36″ outswing exterior door. An outswing door can always be opened, regardless of shed contents. A pre-hung steel outside door is platonic in this situation, because information technology offers weatherstripping and is fully insulated.
Installing sheetrock and fire taping is a good thought for a heated room. The sheetrock too helps to protect the fiberglass insulation. Exterior sheathing and siding type also factors into the oestrus-holding ability of the construction. I chose "double wall" structure with 1/2″ sheathing, and 1/two″ T1-11 siding. Each layer adds approximately .81 R value. Staggering the seams between the sheathing and siding layers helps avoid air infiltration.
I besides wrapped the shed with Tyvek® HomeWrap®. The membrane was taped and "lapped to the weather condition" and so if the tape ever fails, any rain that gets behind the siding would however be shed down and away by the HomeWrap.
I opted not to install a true vapor bulwark between the framing and sheetrock, because of potential condensation and mold problems with sheds constructed this way. This shed will be substantially unheated for much of the year and very hot during the kiln-drying cycles. A shed kiln has minimal venting (usually one or ii gable vents) and sealed soffits. For these reasons, I feel information technology is best to let the shed breathe, and forgo a plastic vapor bulwark.
Electrical requirements for a DIY kiln are pretty straightforward, only hiring an electrician is yet a good idea. Add up the amp draw on all the equipment you lot programme to use in the kiln, including a heater, dehumidifier, fans and steam generator. Brand sure the full amp draw is well within the limit of your electrical circuit. Don't even think of powering your kiln with an extension cord.
Drying Properties, Kiln Science
If you intend to kiln dry out lumber from a light-green state, right off the sawmill, you will need to be well-versed in airflow rates and follow a detailed drying schedule. Drying lumber also quickly can pb to deep terminate checking, warping and case hardening. Case hardening is a defect caused by the outer portion of a board drying quickly, while the inner portion dries more slowly. This tin create internal stress in the lumber that is released when sawing. If severe plenty, the lumber tin develop honeycomb cracks throughout.
Notwithstanding, if you kiln dry hardwood lumber that has already been air dried, the process is much more forgiving. Most species of hardwood lumber can be safely dried this fashion, one time the moisture content is xx% to 25% or less. The fact is, most of my stacks of lumber air dry to 15% moisture content earlier entering the kiln. I hope that the sawyer coated the ends of the lumber with Ballast-Seal® or oil-based paint when it was green. This slows the end-grain drying and limits the severity of end checking.
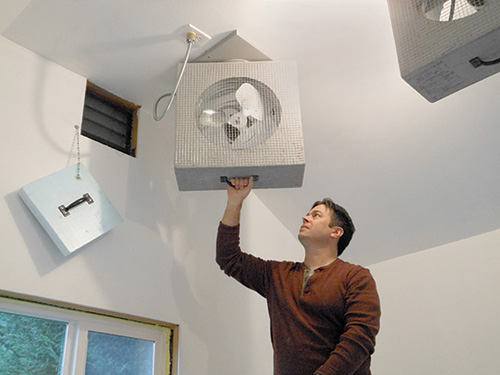
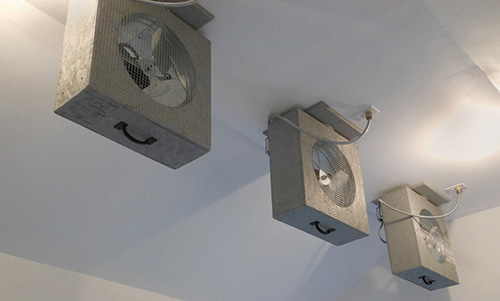
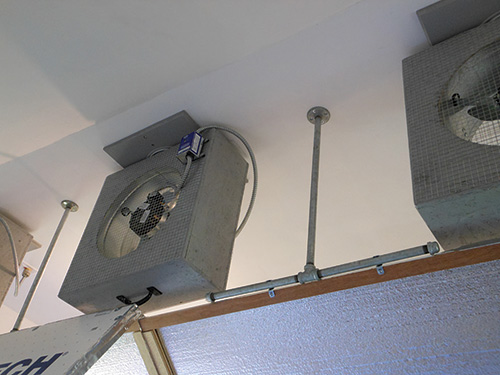
Cranium fans are a perfect mode to provide airflow over the stacks of lumber. They are normally mounted in the gable of household attics, and they are designed to be used in high temperature environments. My kiln uses four ceiling-mounted fans, each rated for ane,600 CFM. For single-stack kilns, stationary fans are adequate. With ii-stack and three stack kilns, it is improve to have reversible fans to change the direction of airflow mid-cycle. This prevents "dead spots" inside the chamber that experience express airflow.
Instead of using expensive electrically reversible fans designed for commercial kilns, I came upwardly with a simple hardware solution. A lazy Susan with 180˚ detents mounts the fan box to the ceiling. I and so manually rotate the fan boxes halfway through the drying bicycle. Also, since heat rises, ceiling-mounted fans have the added do good of circulating the warmest air over the lumber.
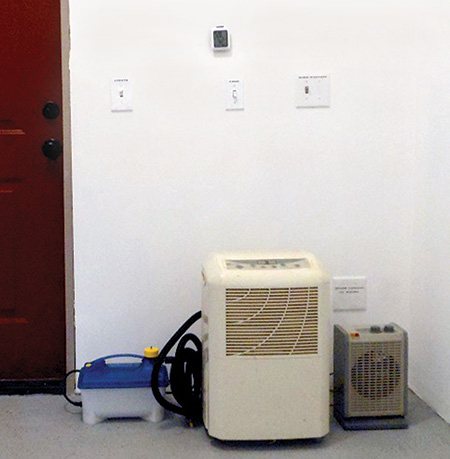
A household dehumidifier (DH) removes moisture from the kiln chamber. By setting the relative humidity (RH) on the dehumidifier, y'all can control how often information technology runs. A higher humidity setting will run the unit sporadically to maintain that RH. A lower RH setting will call for the DH to run more often. There are 2 ways to remove water from the DH unit, and they both work well. The h2o tray tin be removed and emptied manually, or a hole can be drilled through the wall of the shed to laissez passer a bleed tube. This volition allow the DH to drain automatically without you needing to enter the kiln. I prefer to empty the water tray manually and tape the volume of water collected. This gives me a secondary method of tracking the drying process, using both water volume and moisture content (MC) readings.
A small electric heater supplies auxiliary rut to maintain adequate kiln temperature. In smaller kilns, the heat generated past the fans and DH motor is sufficient to maintain temperatures in excess of 100 degrees. In larger kilns, the heater may be needed in the latter part of the drying cycle. For all kiln drying schedules, a heater should exist used to sterilize the lumber and kill any insects that may be present. For a kiln temperature of 140˚ F, sterilization takes three to five hours. With a 130˚ F kiln temperature, sterilization volition accept 10 to 12 hours (Dry Kiln Operators Transmission, 1991). These figures concur true for lumber up to 2″ thick. For sterilizing thicker lumber, additional fourth dimension is required.
Select a heater with an adjustable thermostat and a tip-over shutoff. This will allow the heater to cycle on and off automatically, according to the kiln operator'south setting. A heavy-duty i,500-watt infinite heater works fine.
A Typical Bike in a Shed Kiln

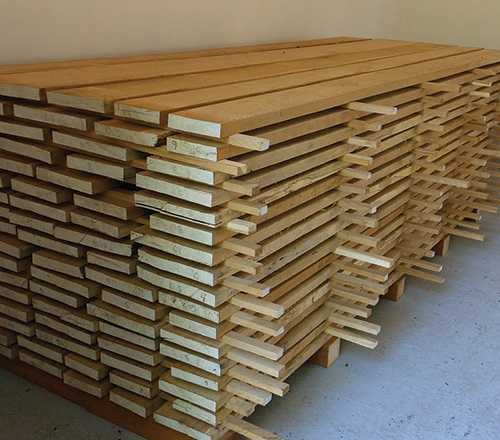
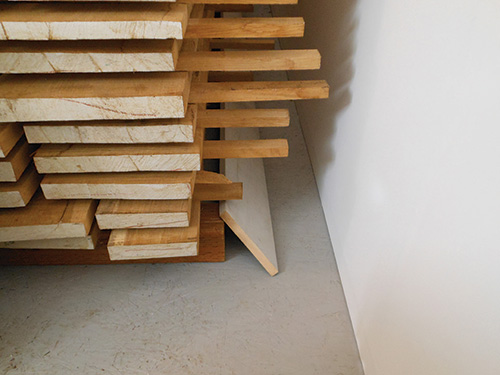
Loading the kiln begins by rousing my sons and letting them know I've planned a solar day of piece of work. After a short menstruum of grumbling, they join me to lay downwards woods blocks for the first layer of lumber. I similar these "starter blocks" to raise the lumber a few inches off the floor. I either utilize some cedar 3″ x 5″, or four″ ten four″ stock. The starter blocks should be every bit long as the stack is broad.
Each layer of lumber is separated from the next by a series of "stickers" or spacer sticks. The stickers are uniform in size and unremarkably iii/iv″ or 1″ square. Milling the stickers foursquare is advantageous over a rectangular cross-section, because no matter how you place the stickers they will grade a level stack. Some other common sticker size is one″ 10 2″, and these work fine every bit well.
Place a sticker at each terminate, and every xvi″ along the stack for 4/iv stock. Sticker spacing can be increased to 24″ apart for five/4 or thicker hardwood. Align the stickers over the starter blocks on the commencement course. And so align each subsequent layer of stickers over the last. This helps continue the lumber directly during the drying bike; in fact, improper placement of stickers can permanently deform lumber. The thinner the stock, the more than disquisitional sticker placement becomes.
Place some sample boards in the stack that will be easy to pull out for moisture testing later. Once all the lumber is stacked and stickered, place baffles over the lumber. The baffles straight airflow over and through the stack and preclude the top layers from drying also quickly. My four master baffles consist of sheets of ane″ Styrofoam™ insulation. I made a simple frame from plywood strips and fastened theinsulation sheets to them with screws and fender washers. This makes lightweight baffles that tin be easily moved and repositioned.
Apply foil tape to the edges of the main baffles to help protect the Styrofoam™. My baffles hang from T-bar assemblies mounted to the ceiling. The T-bars are fabricated from 1/two″ galvanized pipe and are attached to the rafters with threaded pipe flanges. To hang the baffles, simply adhere hooks to the plywood frame. I constitute that brackets for mounting rigid metal electric conduit work best. Select three/iv″ conduit brackets for hanging baffles on 1/ii″ galvanized pipe.
If your lumber stack is congenital on starter blocks, you will need to limit airflow there likewise. Place a ane×6 board on the floor backside the stack, tilted to a 45˚ angle. This kicker lath volition help distribute the airflow more evenly through all layers of lumber. Basically, y'all don't desire all of the air rushing out under the stack, and then find a mode to redirect it. End baffles are also a proficient idea to prevent airflow from bypassing the stack entirely. For end baffles, I utilise 2″-thick rigid foam insulation screwed to the main baffles. The baffles do not demand insulating properties, and plywood would work merely as well.
I cannot stress the importance of baffles enough. Without baffles, the top layers of lumber experience "murphy chipping" with cupping, twisting or warping. This problem is magnified if the lumber is thin or flatsawn. Thicker lumber like five/4 or quartersawn lumber is naturally more stable. In addition, weight on top of the stack can exist helpful, but nothing replaces baffles for the all-time lumber yield. The last thing to practise before starting the kiln is to shut the gable vent with an insulated cover.
My kiln schedule starts with running all fans and the dehumidifier for two days, measuring and removing water equally information technology accumulates. Initially, I set the DH to 40% RH, because I don't want to remove moisture too speedily. I usually come across a large volume of water in the DH each night when I check the kiln.
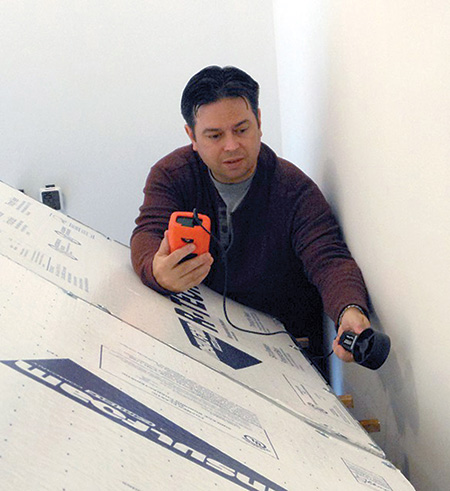
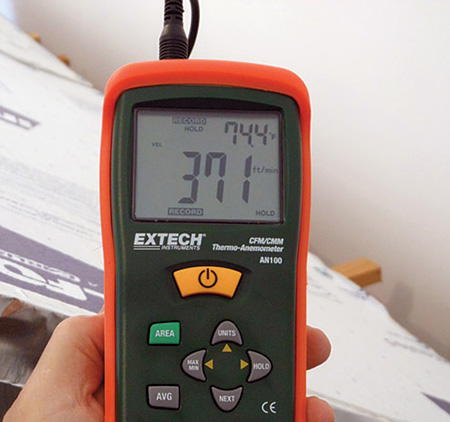
An anemometer confirms that your attempt constructing baffles was worthwhile. Measure airflow over the stacks of lumber in various locations. Air speed of 350 feet per minute is appropriate for common hardwoods such as oak and maple. Also bank check that air isn't escaping around the side baffles or under the stack of lumber. Adjust the baffles or fan direction to achieve skillful airflow.
Afterward two days operating merely the fans and DH, I take note of the temperature. (I accept found that remotely monitoring the temperature and humidity with a WiFi sensor tin be very helpful. It's a nice use of applied science and adds a measure of safety besides.) If the fans and dehumidifer generate enough oestrus to maintain a temperature of 100˚ to 120˚ F, and so I won't employ the auxiliary heater. If the temperature is beneath this range, I commencement the heater and accommodate the thermostat accordingly. After four days, I decrease the RH setting on the DH to 30% and proceed to run the fans.
After seven to 10 days, I contrary the fan direction to brand sure all stacks of lumber dry evenly. Soon the DH won't show much water collected in the tray. If MC readings nevertheless aren't at the desired range, the heat may need to be increased for the remainder of the drying bike. Remove samples from the stack, and cutting an inch or two off one end. Take a moisture reading in the end grain with a pin-blazon wet meter or remote probe. (I use the Mini-Ligno MD/C from Lignomat, www.lignomatusa.com.) Once the core readings are 6% to 8% on a fresh cut, the lumber is dry out and ready for sterilization. Omitting the sterilization phase tin lead to costly losses from insect impairment, so don't skip it.
For the sterilization stage, air temperature needs to exist around 140˚ F, for three to five hours. Take the electronics out of the kiln, and continue operating the heater and fans during this phase. The DH is not needed at this time, as the lumber is already bone-dry. I find that unplugging the DH is helpful during the sterilization stage so I tin add a second heater, without overwhelming my electrical circuit.
Once the lumber is sterilized, it is set for the conditioning phase. To condition the lumber, I introduce steam into the kiln for near two hours. This returns some moisture to the very dry exterior of the lumber, while non affecting the core wet level. I utilize a Rockler steam generator, item #42826 (world wide web.rockler.com). During the conditioning procedure, the only equipment operating are the fans, heater and the steam generator — no dehumidifier.
Cost-saving Conclusions
Looking at the cost-do good analysis of a shed kiln can be enlightening. On the last load of lumber I purchased, I saved $ii.fifty per board pes compared to retail prices for kiln-dried lumber. The order was 540 lath feet (BF) of v/four white oak. On this guild solitary, I saved over $i,300 past drying the lumber myself. This, of form, is gross savings; we must calculate electrical costs to determine the net savings: in this instance, near $62. Check out "More On the Web" for my complete calculations to figure savings.
If nosotros revisit the example of a $i,300 gross savings from a load of 540 BF of white oak lumber, and we subtract the estimated price of $62 to kiln dry the lumber, nosotros arrive at a net savings of $1,238 less than retail. That buy was an average deal, and one I don't consider a item deal. I oftentimes buy from sawyers or homeowners at 40% to 50% of retail price. Frequently, the lumber has already air-dried for several years in a barn or outbuilding. When that is the example, I know I'll have usable lumber in just a few weeks.
If yous use a lot of lumber, and you're a decent hand at carpentry, a shed kiln will quickly pay for itself. Perhaps the best part: you won't need to calculate your lumber needs down to the lath foot. But walk out to the shed kiln and catch what you need from your custom-stale supply.
– Willie Sandry is a furniture maker and a lumber kiln operator in Camas, Washington.

What Size Kiln For 2000 Board Foot Of Lumber,
Source: https://www.woodworkersjournal.com/design-operate-small-scale-dehumidification-kiln/
Posted by: selfancel1979.blogspot.com
0 Response to "What Size Kiln For 2000 Board Foot Of Lumber"
Post a Comment